Transaction Dashboard User Guide
While some business owners prefer to look at income and expense transactions separately, many bookkeepers and power users prefer to see all of the deposits and withdrawals listed together in one combined view.
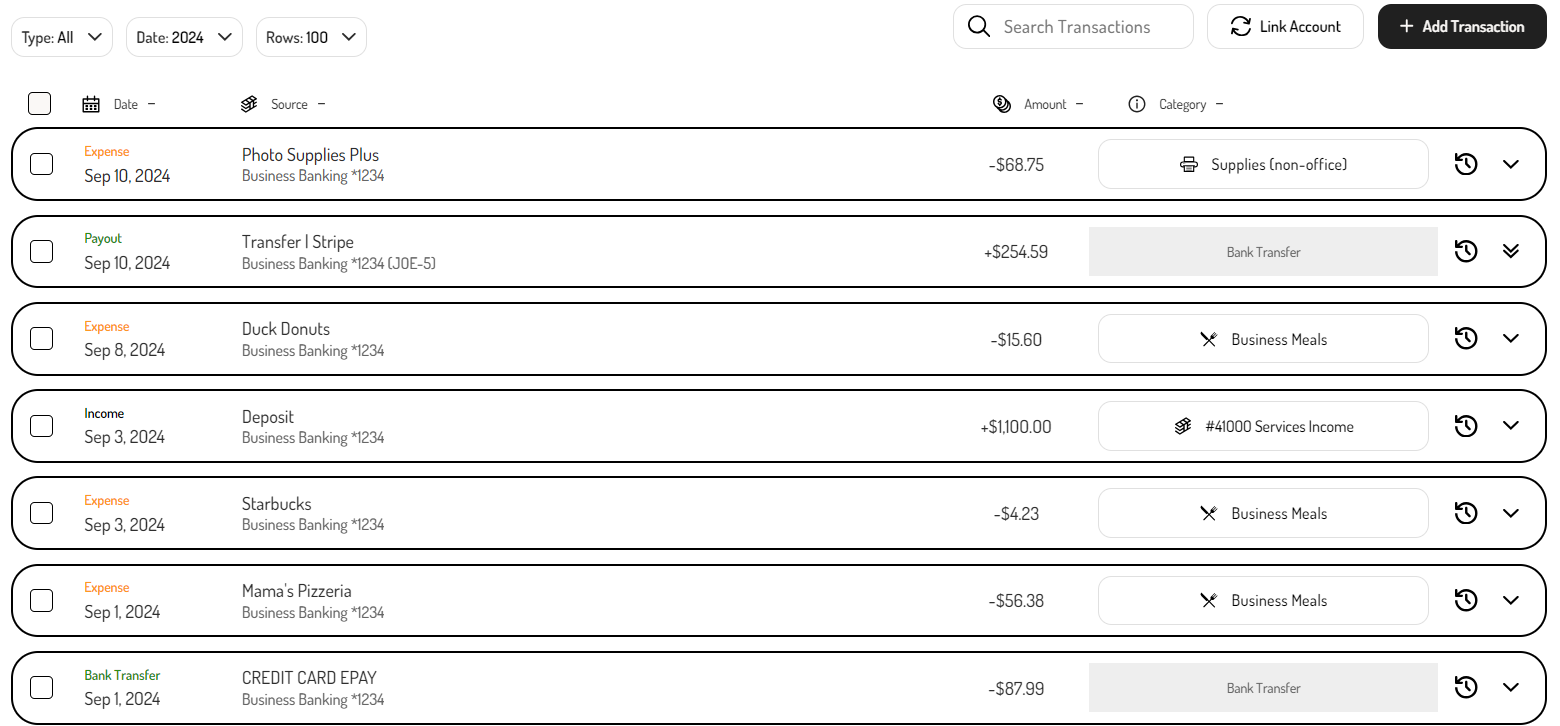
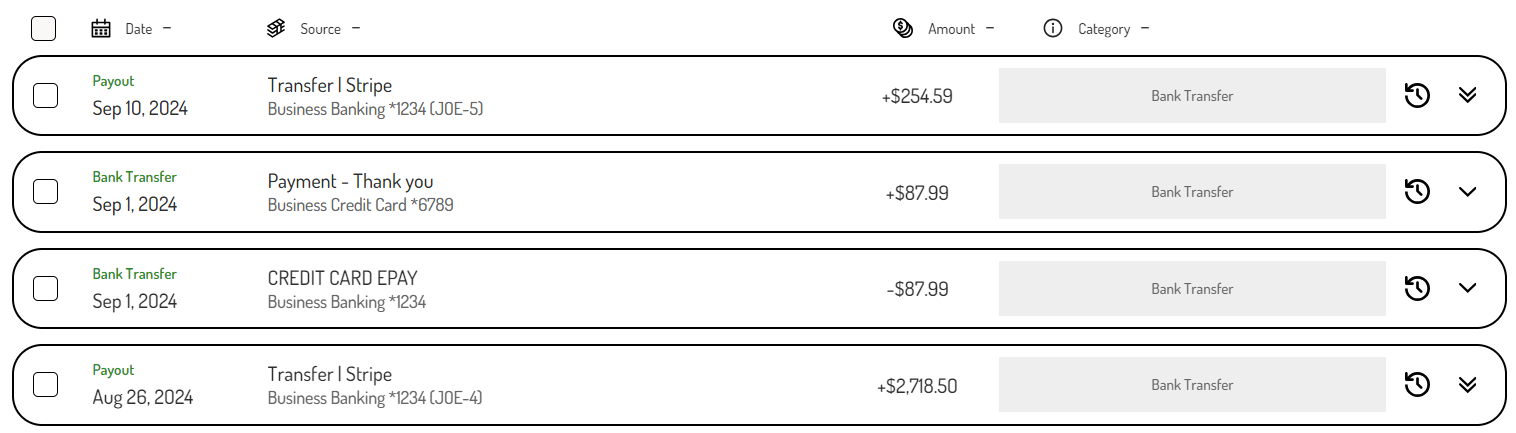
The Transaction Dashboard displays all transactions from all data sources, with each transaction neatly categorized and reconciled against related transactions.
Getting started with the Transaction Dashboard
Transactions are automatically categorized, so there typically isn't any action required by the bookkeeper or business owner to categorize the transactions.
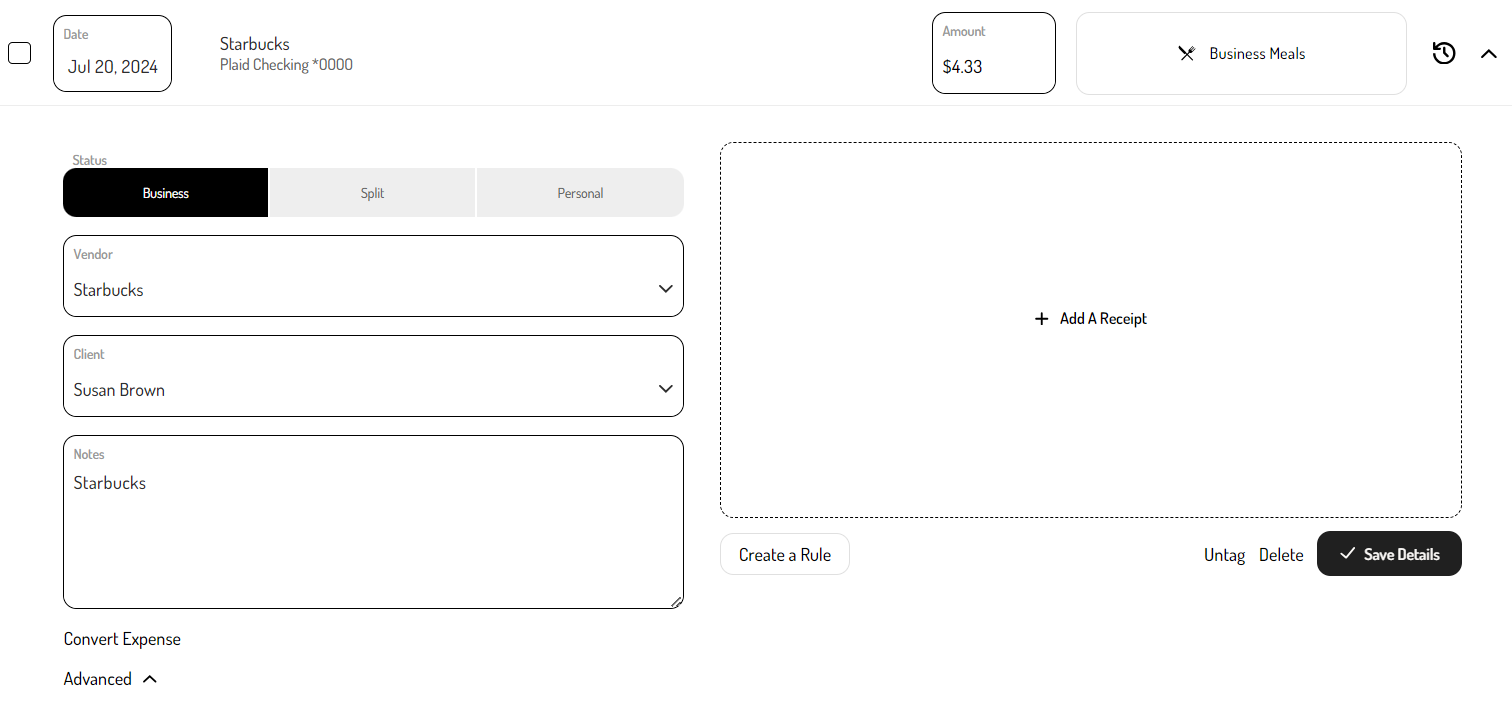
Any transaction can be clicked on to view more details. As needed, transactions can be modified to edit the categorization, change the transaction type, or add more details such as receipts or client information.
Navigating the Transaction Dashboard
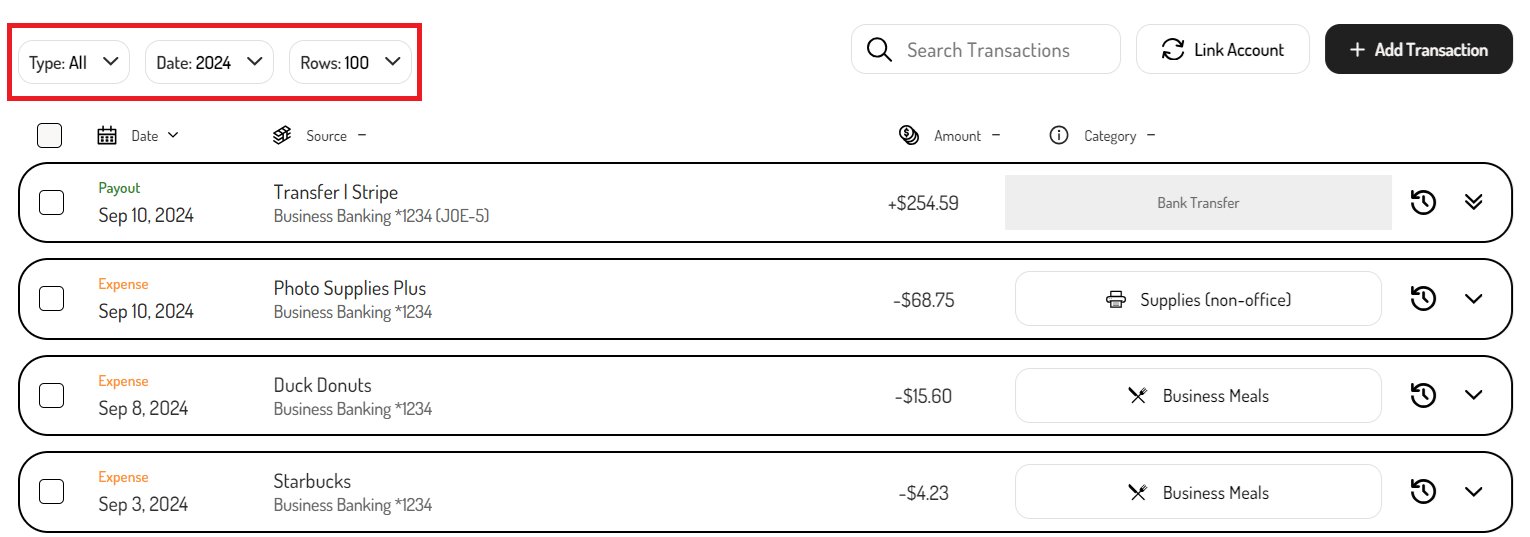
By default, transactions are listed in date descending order. The row headings can be clicked to re-order the transactions based on that particular column.
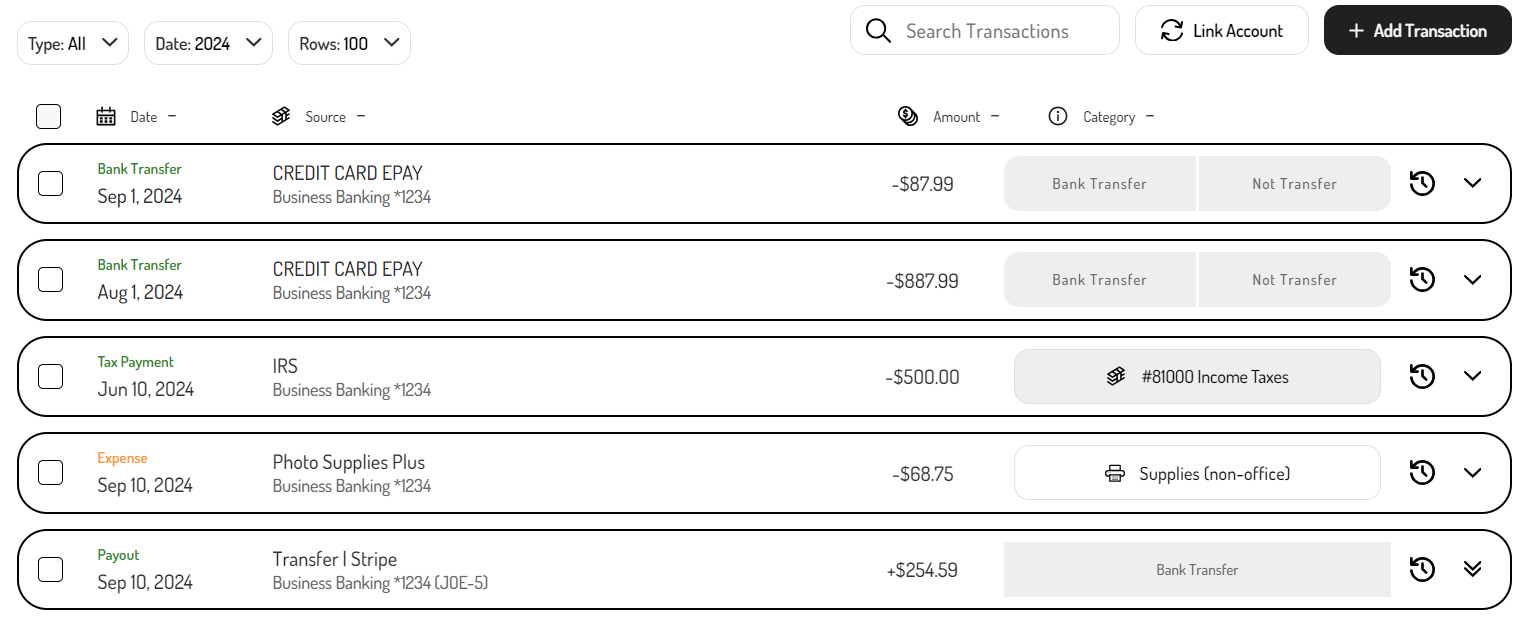
In cases where transactions need to be confirmed (i.e. a Bank Transfer that could not automatically be matched or a possible Tax Payment), they will be floated to the top to indicate an action needs to be taken.
Using the filters
Filters can be used to filter the transactions by Type, Date, or Rows.
Type filter
The Type filter can be used to easily view specific transactions, such as:
- All - All except the ones that have been archived.
- Untagged - All that require confirmation.
- Business - All that are for Business purposes.
- Personal - All are for Personal purposes.
- Archived - All that have been archived.
- Refunds - All expense or income refunds.
- Assets - All assigned to an asset category/GL account.
- Equity - All assigned to an equity category/GL account.
- Liabilities - All assigned to a liabilities category/GL account.
- Other Expenses - All assigned to an other expenses category/GL account.
- Bank Transfers - All bank transfers.
- Tax Payments - All income tax payments.
- Payroll - All associated with payroll runs from a linked payroll account.
- Other Income - All assigned to an other income category/GL account.
- Invoice Payments - All associated with sent invoices.
- Suspense - All assigned to a suspense category/GL account.
Date filter
The Date filter can be used to view transactions from a specific timeframe. These options include:
- Current Year - All from the current year.
- Past Year - All from the past year.
- Custom Range - All transactions from the custom timeframe that is set.
Row filter
The Rows filter can be set to specify how many transactions are displayed on each page. These options range up to 250.
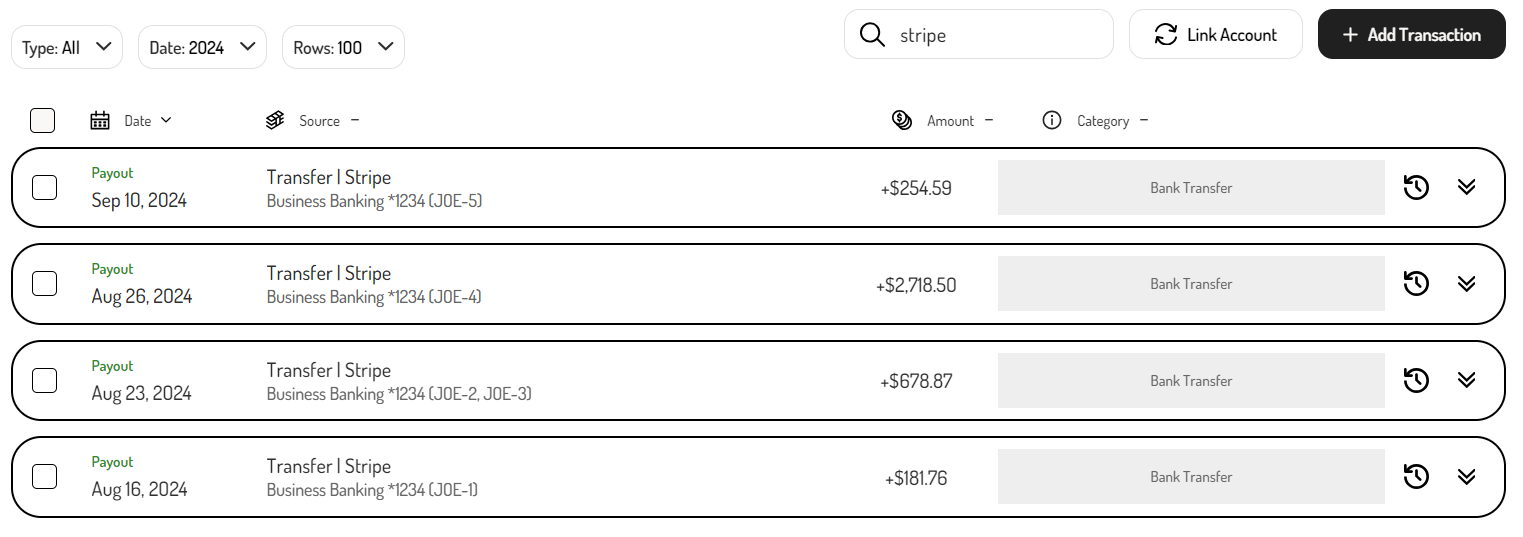
Using the search feature
The search feature can be used to search for specific transactions based on the vendor, amount, or category.
Editing transactions
Transactions can be edited at any time directly from the Transaction Dashboard. Once located via filtering or search, users can click on the transaction to expand its details, enabling them to make edits, convert the transaction, or add additional information.
Bulk editing transactions
In addition to editing transactions individually, certain fields can be modified in bulk. To do this, select the checkbox next to each transaction requiring the same edits, then use the options at the top to apply changes to all selected transactions.
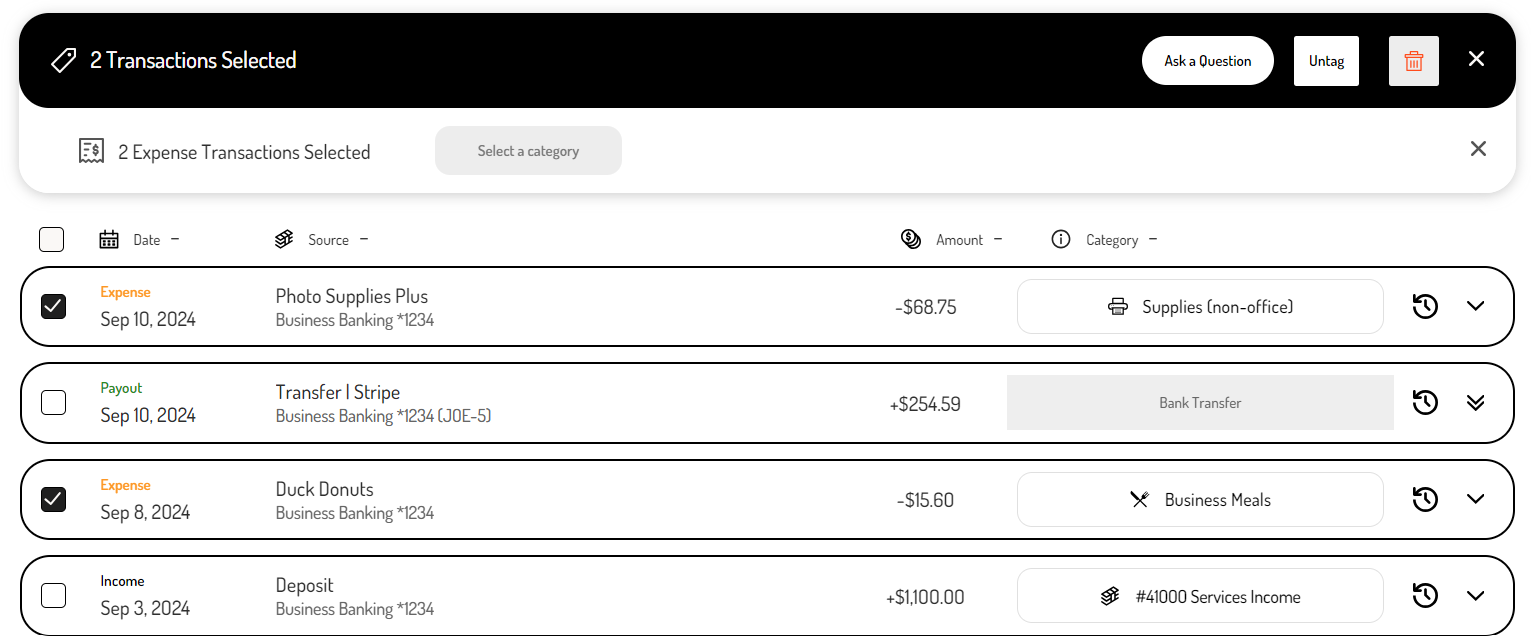
The bulk edit options include:
- Selecting a category for expense transactions.
- Selecting an account for income transactions.
- Confirming Bank Transfers.
- Confirming tax payments.
- Untagging transactions.
- Deleting transactions.
- Asking the business owner a question about the transactions (available in the bookkeeper view only, when using the Front integration).
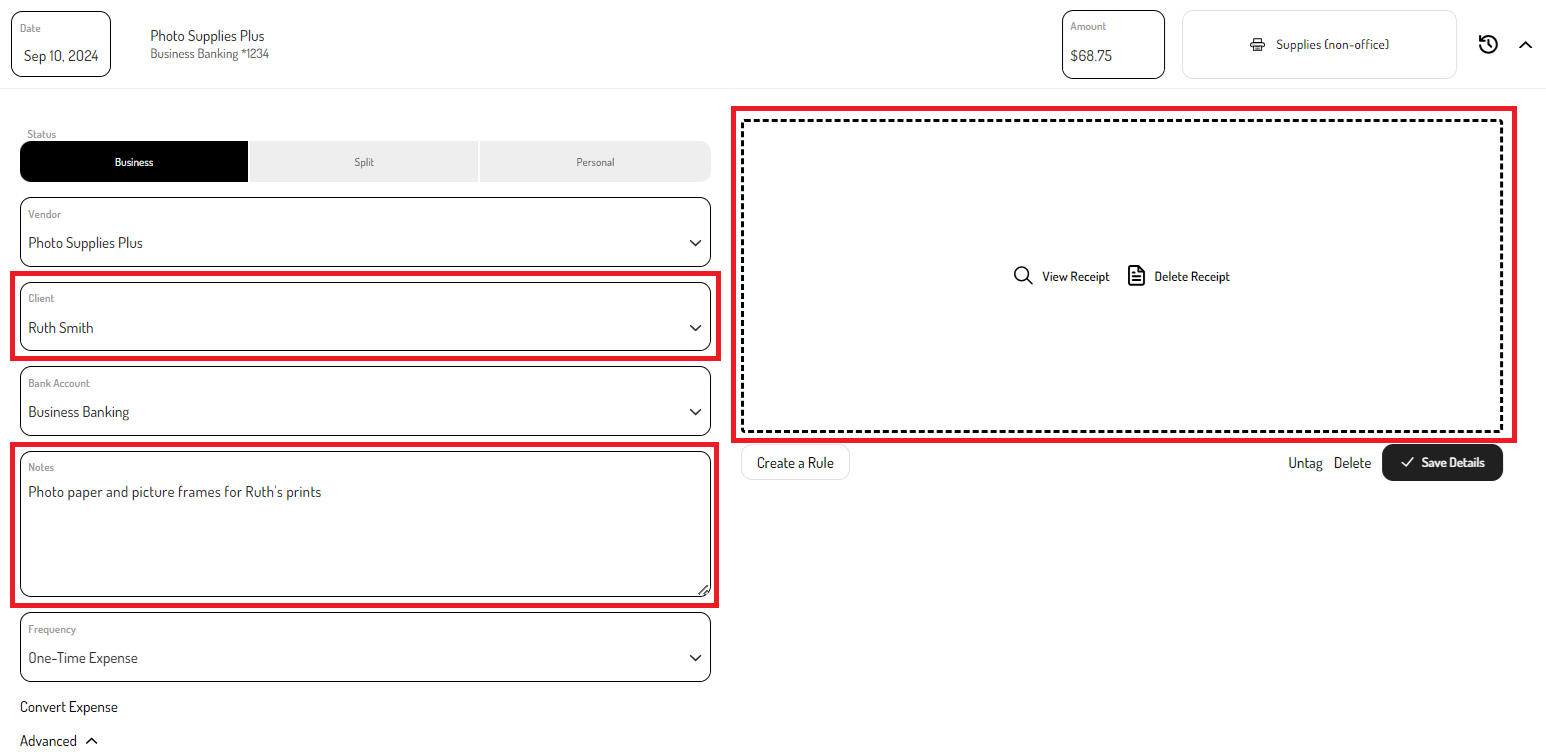
Adding transaction details
In addition to tracking the basic details of a transaction (e.g., date, vendor, amount, category), there are additional fields available to capture more data, such as the client associated with the transaction, any notes, and the transaction receipt.
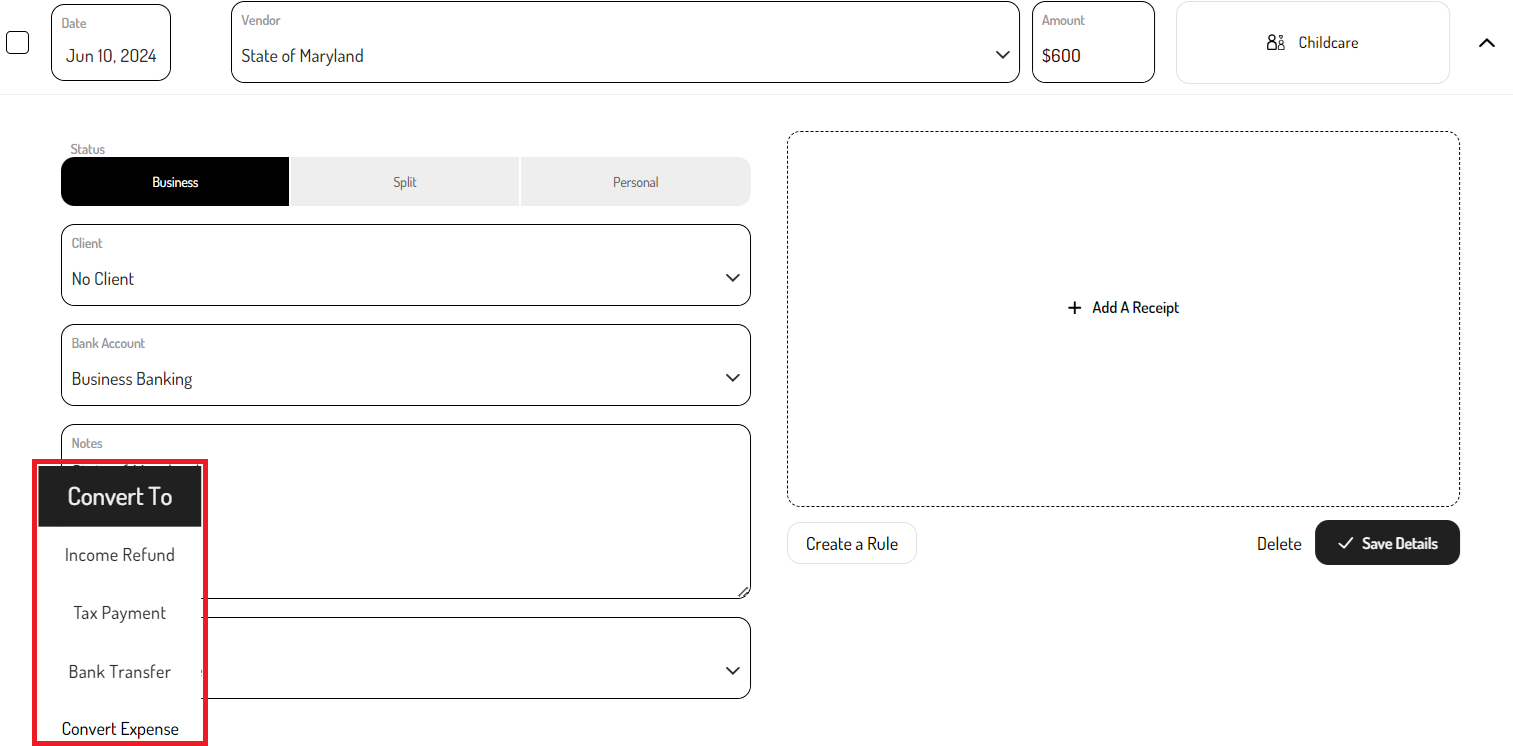
Converting transactions
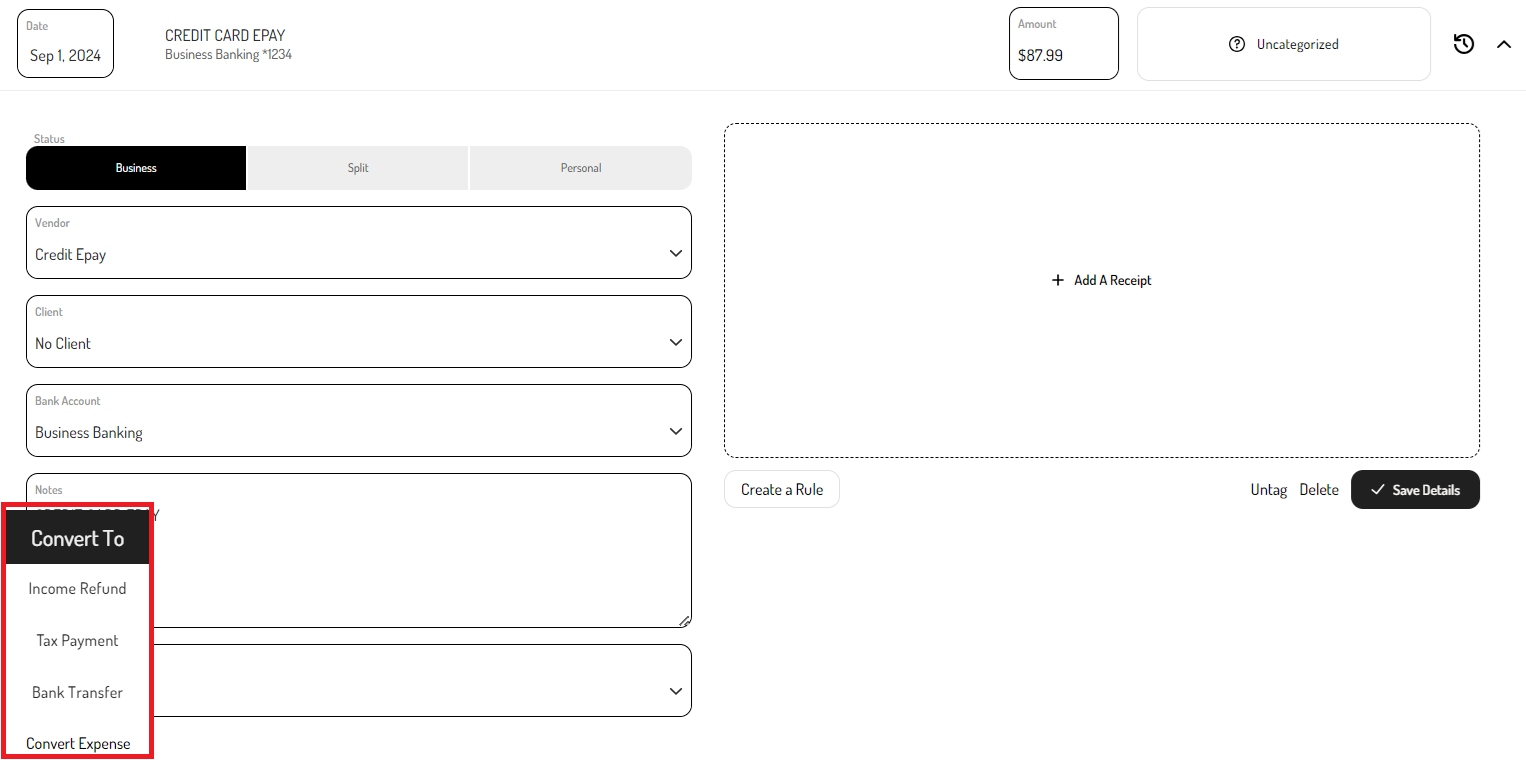
Transactions can be classified as one of several types: Income, Expense, Refund, Bank Transfer, or Tax Payment. Typically, the system accurately detects the type, so no action is required. However, in cases of incorrect detection (e.g., a Tax Payment is marked as an Expense), transactions can be manually converted. To do this, click on the transaction to expand it, then select the "Convert to..." button to change the transaction type.
Note: The conversion must respect the transaction's positive/negative sign, meaning withdrawals cannot be converted to a deposit-type transaction and vice versa.
Splitting transactions
There are certain situations where a single transaction may need to be split. These situations include:
- A single expense that includes items that fall into multiple business expense categories. For example, if a business owner placed an online order that includes supplies for their office and also business gifts for their client, the expense may need to be split between multiple business expense categories.
- A single expense that is for multiple clients (e.g. a purchase that includes supplies for two different clients). For example, if a business owner goes to a home goods store and purchases items to stage homes for two different clients, the expense can be split between the two clients.
- A single expense that includes both business and personal items (e.g. a utility bill for a business owner who has a home office). For example, if a business owner has a home office, a utility bill may need to be split between business and personal expense categories.
To split an expense:
- Click on the expense that needs to be split.
- Click the ‘Split’ button.
- A pop up will appear with two line items, each prompting to select a category; if the expense needs to be split more than two ways, click ‘+Add New’.
- By default, the expense is split equally, but the amounts can be edited by clicking on them and entering the desired value.
- After splitting the expense, click the ‘Save’ button.
- If an expense needs to be split between multiple clients, toggle on the ‘Split by business’ toggle (Note that this option will only appear if the owner is tracking multiple businesses or clients).
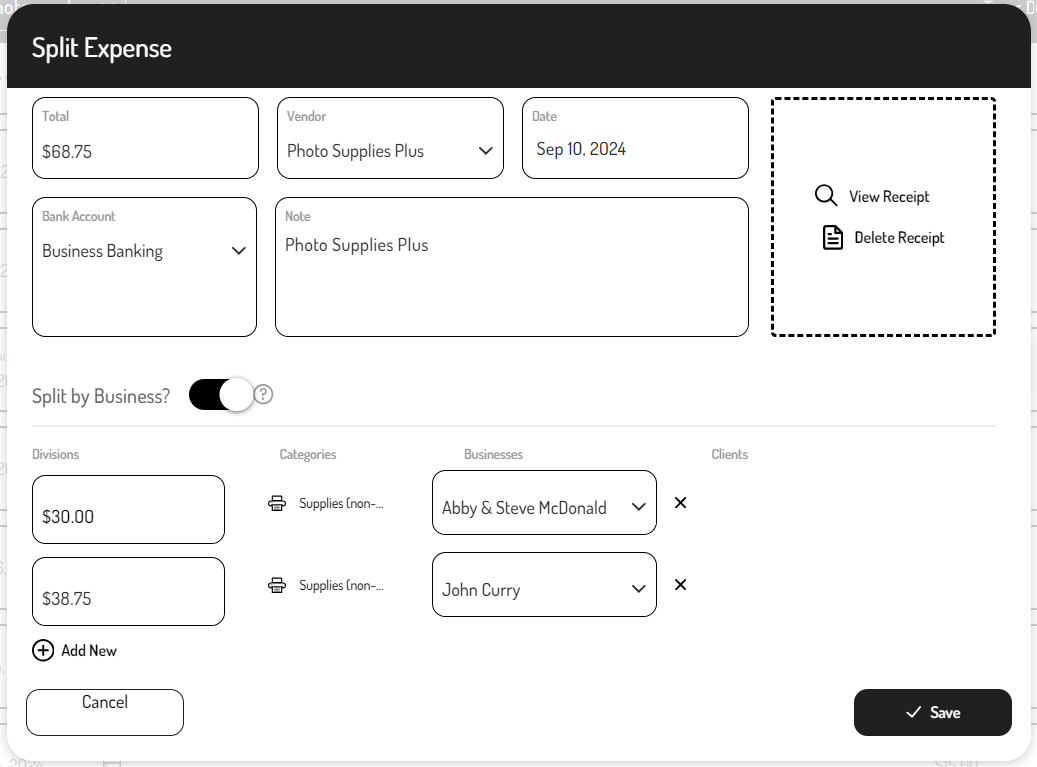
In the Transaction Dashboard, split expenses will display a double chevron icon, indicating that they can be expanded to view or edit the individual split transactions.
Deleting and restoring transactions
When transactions are deleted via the Hurdlr API or Hurdlr’s Embedded UI, they are not permanently deleted; rather they are moved to the Archived section of the Transaction Dashboard. This allows for easy restoration if a transaction is deleted accidentally.
To delete a transaction:
- Navigate to the Transaction Dashboard.
- Click on the transaction to be deleted.
- Click the ‘Delete’ button.
Transactions can also be deleted in bulk using the bulk editing feature.
To view and restore deleted transactions:
- Navigate to the Transaction Dashboard.
- Click the type filter and select ‘Archived’ from the drop-down menu.
- Click on the transaction to be restored.
- Click the ‘Restore’ button.
- Confirm that the transaction should be restored.
Archived transactions can also be restored in bulk by selecting the checkbox next to each transaction and using the buttons at the top to select the category or account for the selected transactions.
Tracking refunds
There are two types of refunds that can affect a business owner's books: Expense Refunds and Income Refunds. Accurately tracking refunds ensures a business owner's income and expenses are accurate and reflect any refunds they've issued or received.
Expense Refunds
Returns/refunds received in linked accounts will automatically pull into the Transaction Dashboard. These transactions are marked with a "Refund" label and show a positive amount, distinguishing them from regular expenses. When categorizing Expense Refunds, it's important to select the same expense category as the original expense, ensuring accurate expense totals for each category.
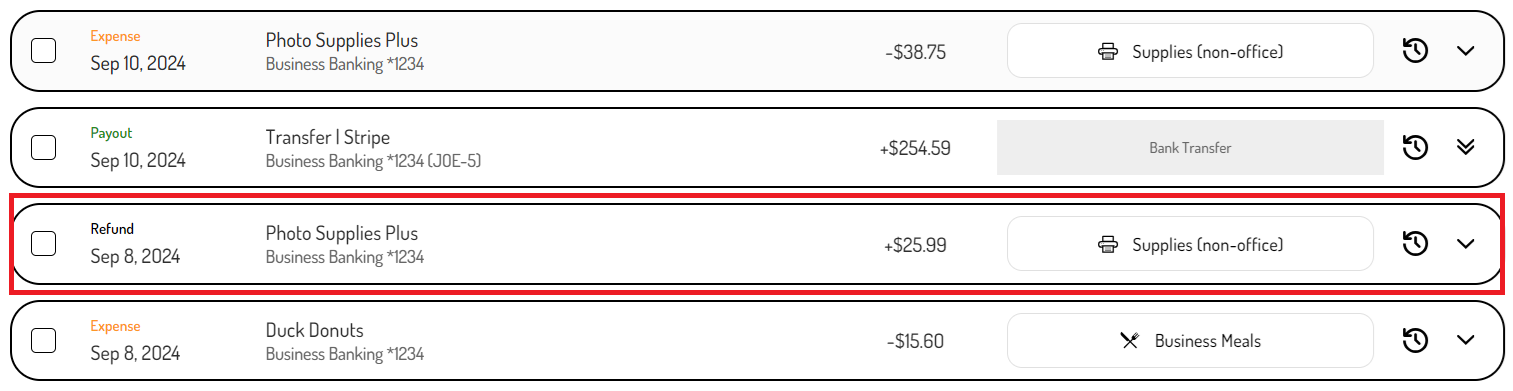
While Hurdlr's algorithm typically detects most Expense Refunds, there's a chance a positive transaction might be categorized as income. If an Expense Refund isn't automatically identified, you can manually convert the transaction from income to an Expense Refund.
To convert an income transaction to an Expense Refund:
-
Click on the income transaction to expand it.
-
Click ‘Convert to...’ and select ‘Expense Refund’.
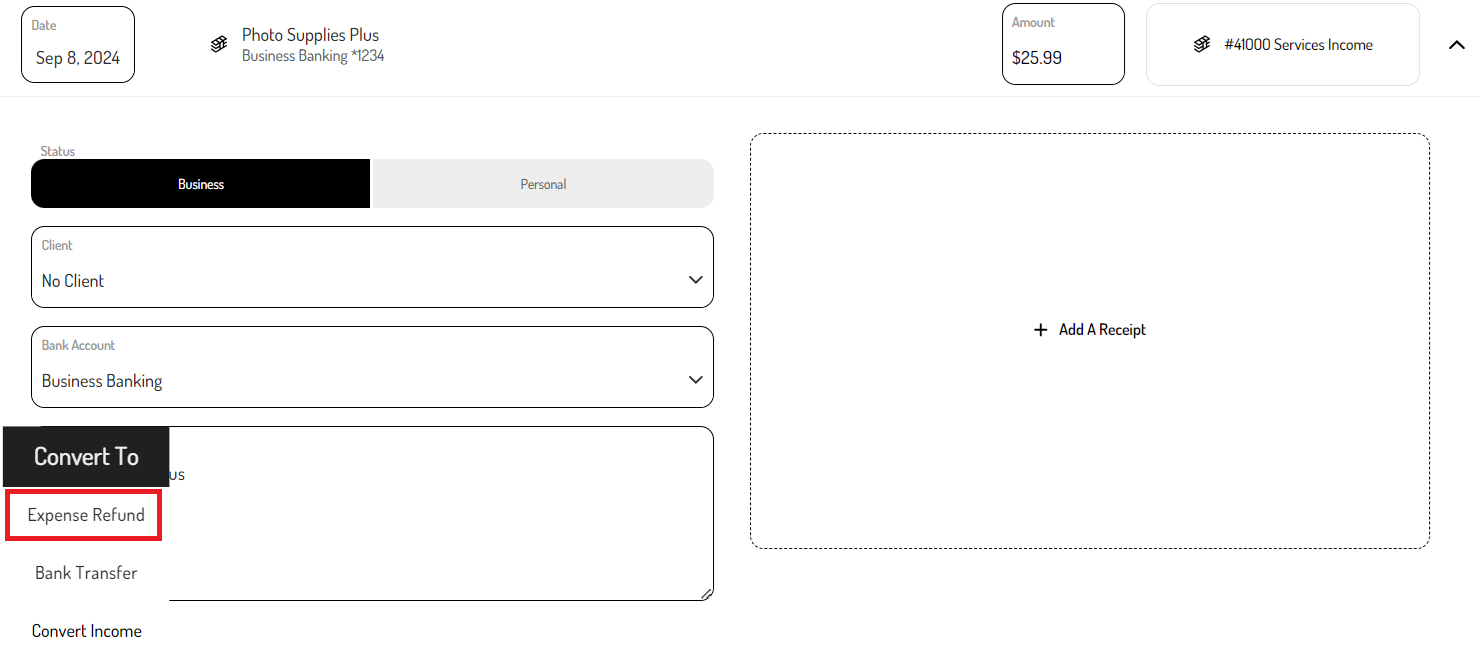
-
Enter all the required details, including the expense category.
-
Select ‘Save Details’.
-
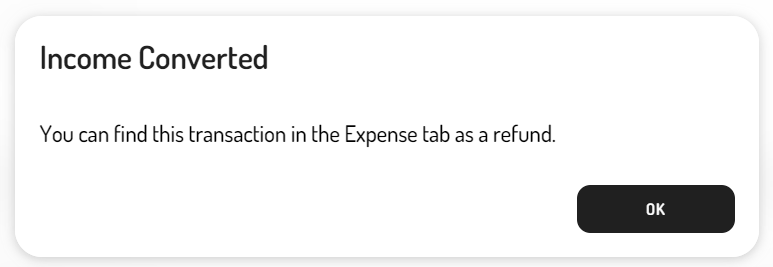
A notification will confirm that the income transaction has been converted.
Income Refunds
There may be times when a business needs to refund their clients (e.g. if a customer returns a purchased product). To maintain accurate records, these transactions should be categorized as Income Refunds. This ensures the income total accurately reflects the net income after any client refunds.
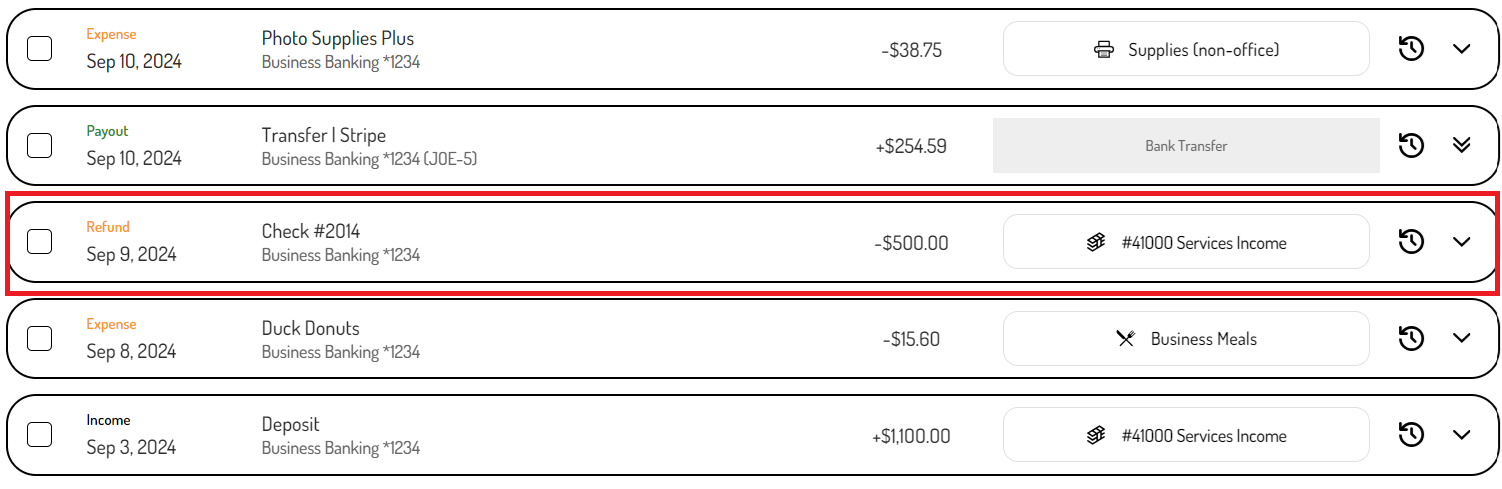
Income Refunds are listed in the Transaction Dashboard as a negative amount with a 'Refund' label. Income Refunds are displayed as negative amounts in income reports, accurately reflecting their impact on reducing the total income.
Income Refunds are challenging to detect automatically because they often appear as withdrawals via checks or bank transfers. As a result, they are typically imported as expenses and require manual conversion.
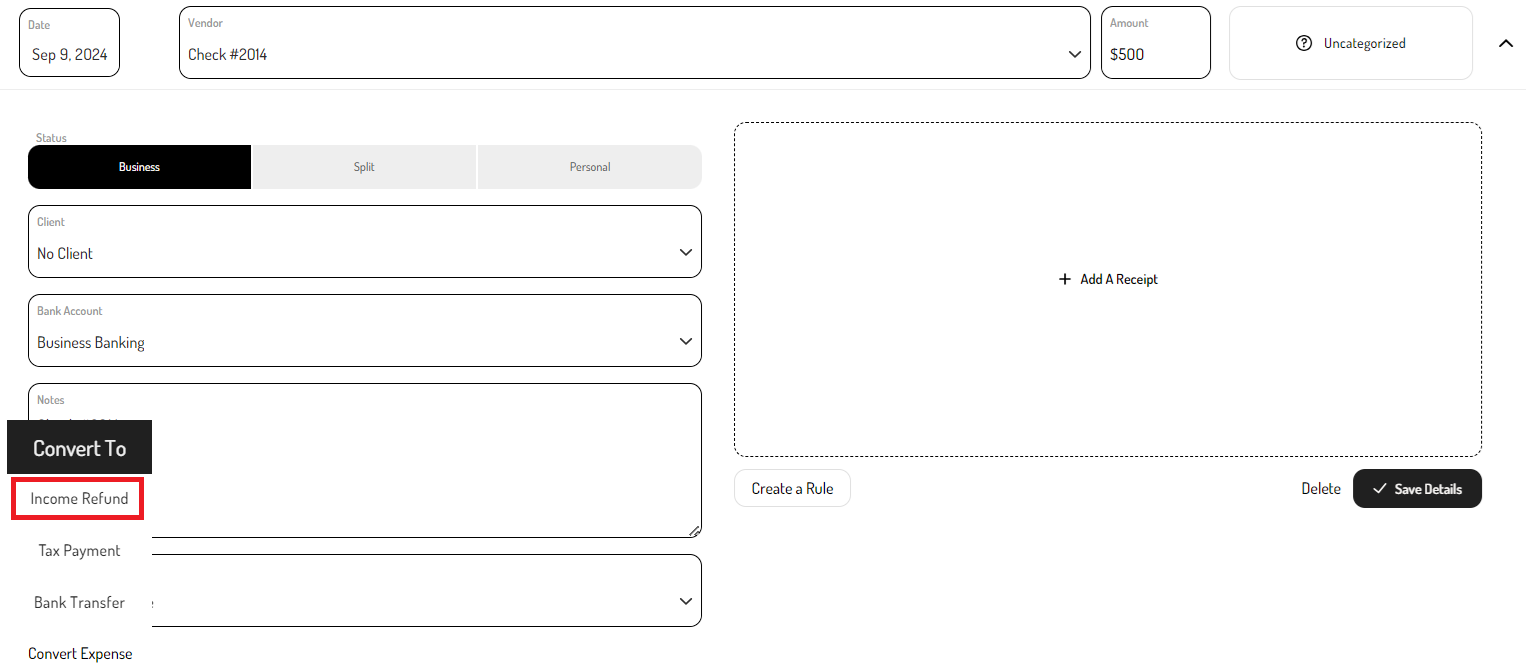
To convert an expense transaction to an Income Refund:
-
Select the expense transaction that needs to be converted to an Income Refund.
-
Click ‘Convert to...’ and choose ‘Income Refund’.
-
Click ‘Save Details'.
-
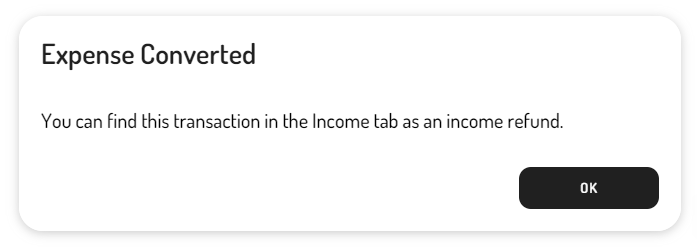
A notification will appear showing that the expense has been converted.
Tracking advanced transactions
Beyond tracking income and expenses, business owners can track more complex transactions such as assets, liabilities, equity, bank transfers, and micro-deposits.
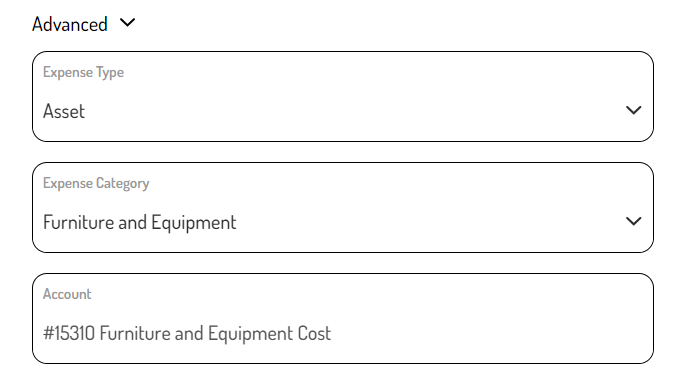
Asset/liabilities/equity transactions
By selecting a transaction, the Advanced section can be expanded to choose an option that corresponds to the asset, liability, and equity accounts in the business owner’s Chart of Accounts.
Bank Transfers
Transfers between a business owner’s accounts, such as credit card payments or transfers between business accounts, should be categorized as Bank Transfers. This ensures accurate cash flow tracking and that the Balance Sheet reflects the correct account balances.
Automatically detected Bank Transfers
Typically, Bank Transfers are automatically tagged and matched to the corresponding transaction when both accounts involved—such as a credit card and the bank account used for payments—are linked. As such, there typically isn't any action required by the bookkeeper or user to categorize Bank Transfers.
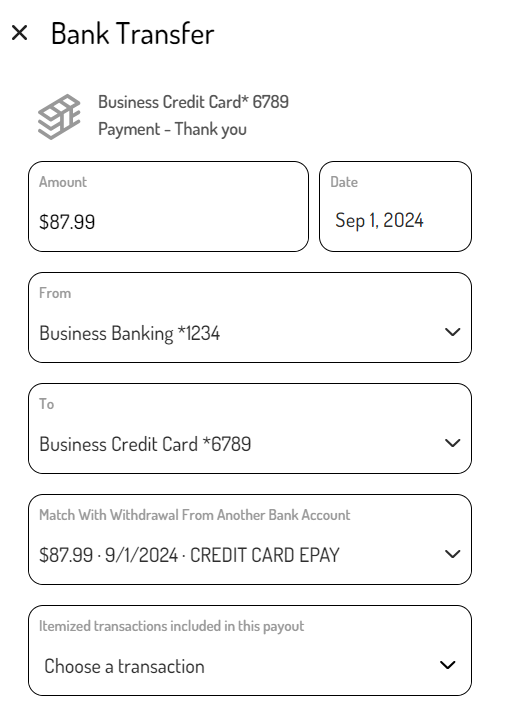
If the corresponding Bank Transfer isn’t detected, a prompt will appear, allowing the user to confirm the Bank Transfer and match it to the relevant account and transaction.

Manually converting a transaction to a Bank Transfer
In rare cases where a Bank Transfer is miscategorized as an income or expense, it can be manually converted to a Bank Transfer.
To convert a transaction to a Bank Transfer:
-
Click on the transaction to expand it.
-
Click ‘Convert to...’ and select ‘Bank Transfer’.
-
Select the corresponding ‘From' and 'To' accounts.
-
If applicable, select the matching transaction in the ‘Match with withdrawal from another bank account’ field.
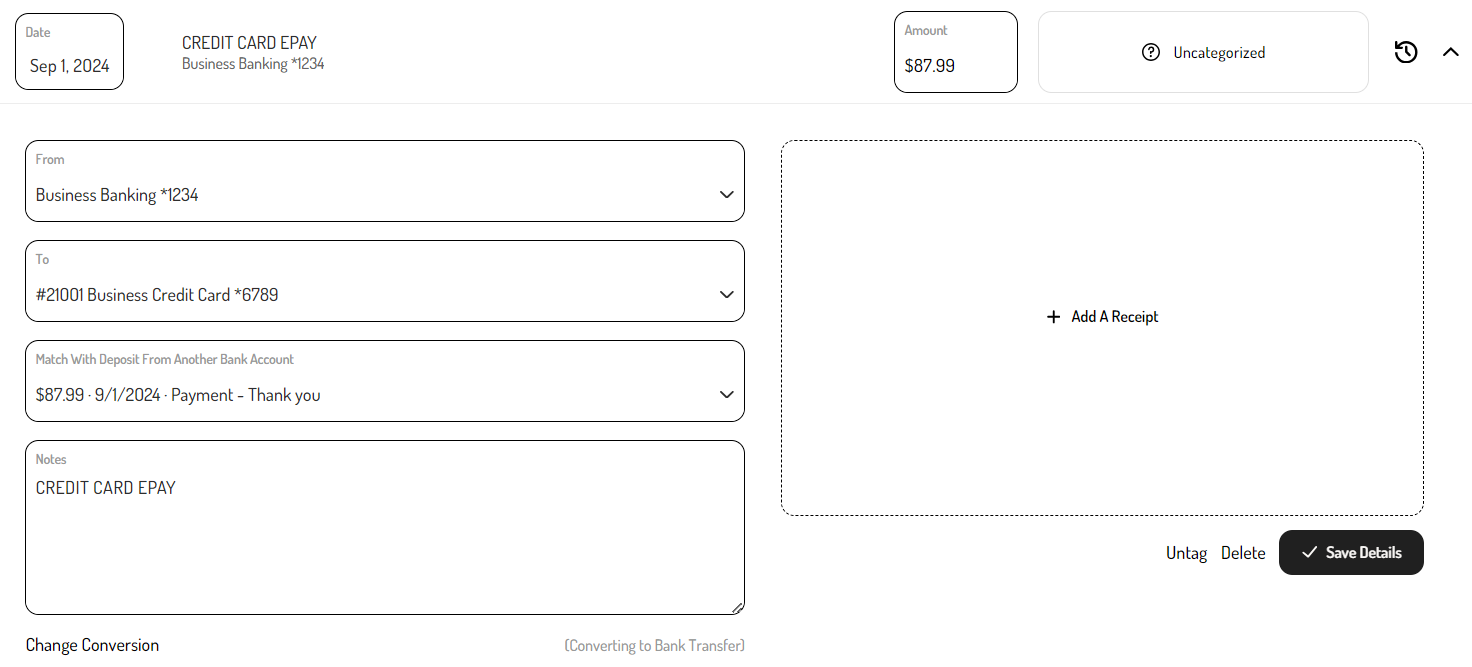
-
Click ‘Save Details’.
Once saved, the income or expense transaction will be converted to a Bank Transfer. This will automatically create a General Ledger entry and apply the Bank Transfer label. Additionally, if a corresponding transaction is selected in the ‘Match with withdrawal from another bank account’ field, it will also be tagged as a Bank Transfer, preventing double-counting.
Micro-deposits
Business owners may receive micro-deposits in their linked accounts as part of an account verification process. To properly record these micro-deposits in the business’s books, they should be categorized as 'Other/Miscellaneous Income'.
To track micro-deposits:
-
Select the transaction corresponding to the micro-deposit.
-
Click ‘Advanced’.
-
In the 'Account' field, choose ‘Other/Miscellaneous Income’.
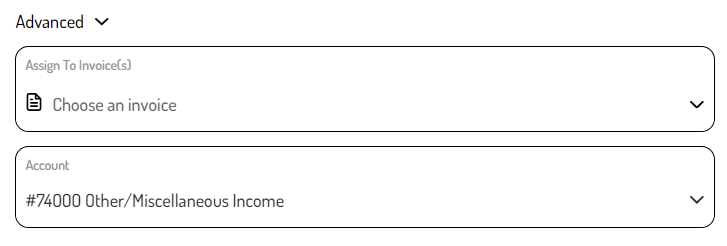
-
Click ‘Save’.
If the micro-deposits are reversed, the corresponding reversals should be recorded as Income Refunds.
If the reversals pull into the Transaction Dashboard as expenses, convert them to Income Refunds and categorize them as 'Other/Miscellaneous Income' to offset the original income recorded.
Manually tracking/importing transactions
There may be instances where transactions cannot be imported automatically through linked accounts, such as:
- The bank or credit card isn’t supported and cannot be linked.
- Transactions need to be pulled from a time period beyond what the bank or credit card shares with third parties.
- Business transactions need to be tracked from a personal bank account or credit card that should not be linked.
In these cases, the business owner can download a bank or credit card statement from their financial institution's website, and it can be imported via the CSV Import feature.
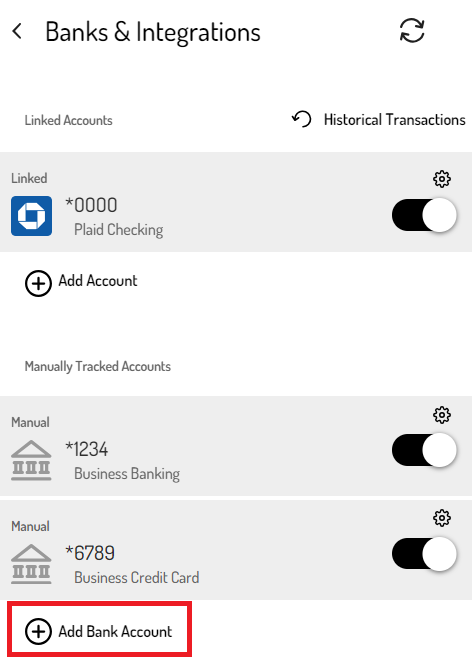
Manually Tracked Accounts
For transactions that need to be manually entered or imported, Manually Tracked Accounts can be used to assign them to a specific account.
To create a Manually Tracked Account:
-
Navigate to the Banks & Integrations screen.
-
Under ‘Manually Tracked Accounts’, click ‘+ Add Bank Account’.
-
Enter the Account Name and Mask (the last 4 digits of the account).
-
Select the Account Type.
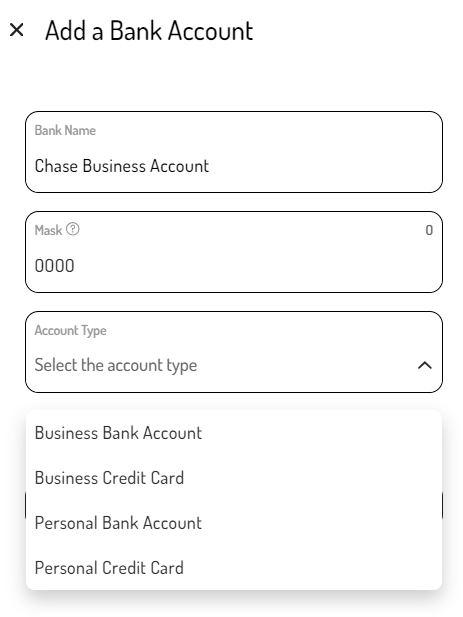
- Business Bank Account
- Choose this option for dedicated business bank accounts.
- Tracking an account as a ‘Business Bank Account’ will create an asset account in the Chart of Accounts and Balance Sheet.
- Business Credit Card
- Choose this option for dedicated business credit cards.
- Tracking an account as a ‘Business Credit Card’ will create a liability account in the Chart of Accounts and Balance Sheet.
- Personal Bank Account
- Use this option to manually enter or import business transactions that went through a personal bank account.
- Transactions associated with a 'Personal Bank Account' will be reflected in the Equity section of the Chart of Accounts and Balance Sheet as an Owner’s Draw, Member’s Draw, Partner’s Draw, Shareholder Distributions, or Shareholder Loans.
- Personal Credit Card
- Use this option to manually enter or import business transactions that went through a personal credit card.
- Transactions associated with a 'Personal Credit Card' will be reflected in the Equity section of the Chart of Accounts and Balance Sheet as an Owner’s Draw, Member’s Draw, Partner’s Draw, Shareholder Distributions, or Shareholder Loans.
- Business Bank Account
-
Click 'Save'.
Merging a Manually Tracked Account to a linked bank account
If a Manually Tracked Account corresponds to a bank account that is already linked (i.e., it has an existing General Ledger account), creating a Manually Tracked Account will result in a separate General Ledger account. Since these accounts represent the same bank account, they should be merged to maintain accuracy across the General Ledger, Chart of Accounts, and Balance Sheet. This process should only be done after completing the CSV Import for the transactions being tracked by the Manually Tracked Account.
To merge a Manually Tracked Account into an existing bank account:
-
Navigate to the Banks & Integrations screen.
-
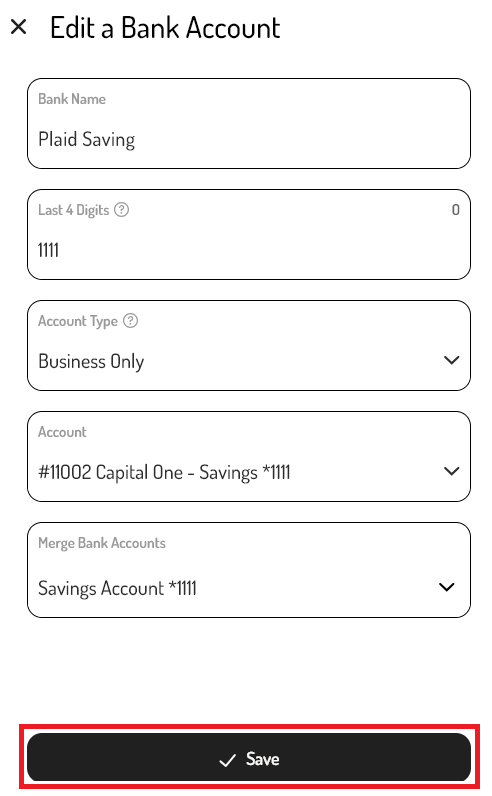
Under ‘Linked Accounts’, click the gear icon next to the account that is linked (e.g. Plaid, Unit).

-
In the edit screen, click the ‘Merge Bank Accounts’ field and select the Manually Tracked Account that corresponds to the linked bank account.

-
Click ‘Save’.
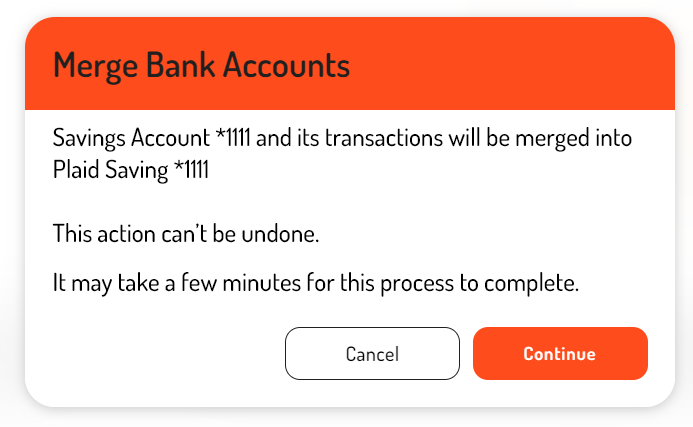
-
A pop up will appear confirming that the selected account(s) should be merged. Click 'Continue' to proceed with the merge.
Once merged, the transactions will be reflected under the linked account into which they were merged in the Transaction Dashboard, General Ledger, Chart of Accounts, Balance Sheet, etc. Additionally, the Manually Tracked Account will be automatically archived with the option to restore it later if needed).
CSV Import
For transactions that cannot be imported automatically, the CSV Import feature offers a quick and efficient way to bring those transactions into a business owner's account.
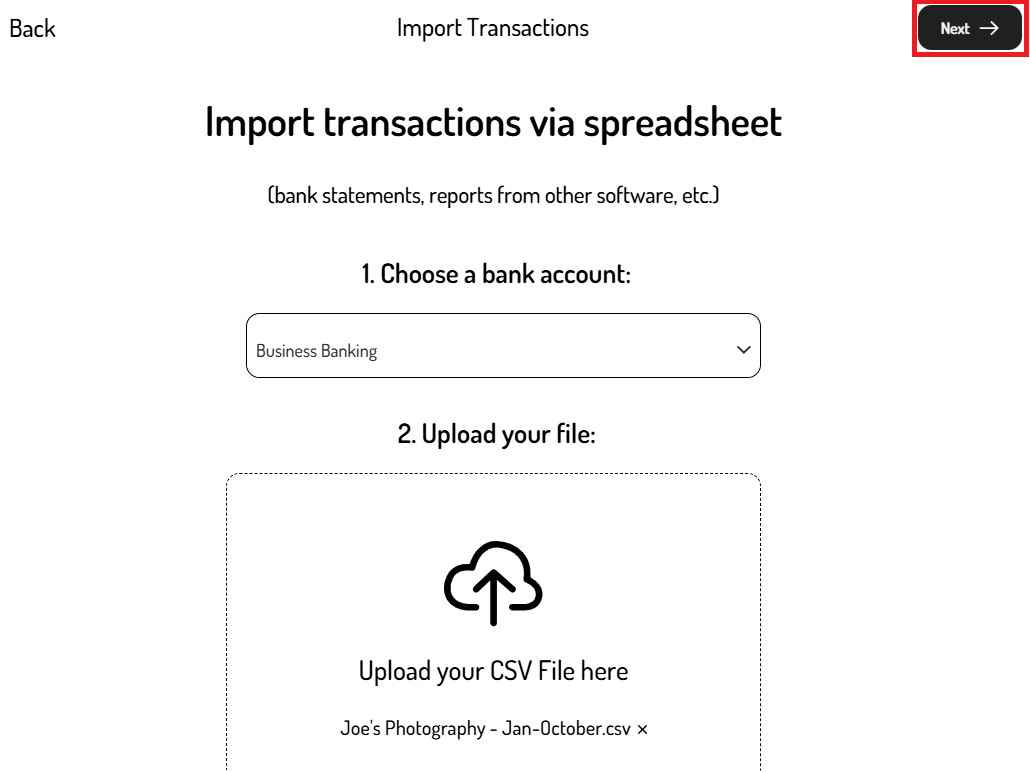
To import transactions via the CSV Import:
-
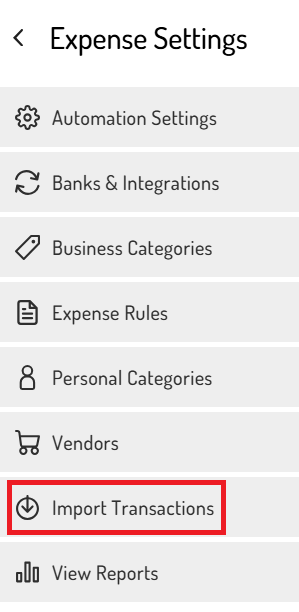
Navigate to the CSV Import feature (most Partners can access this by clicking the settings cog on the Expense Dashboard or Income Dashboard and then selecting 'Import Transactions').
-
Select the Manually Tracked Account associated with the transactions.
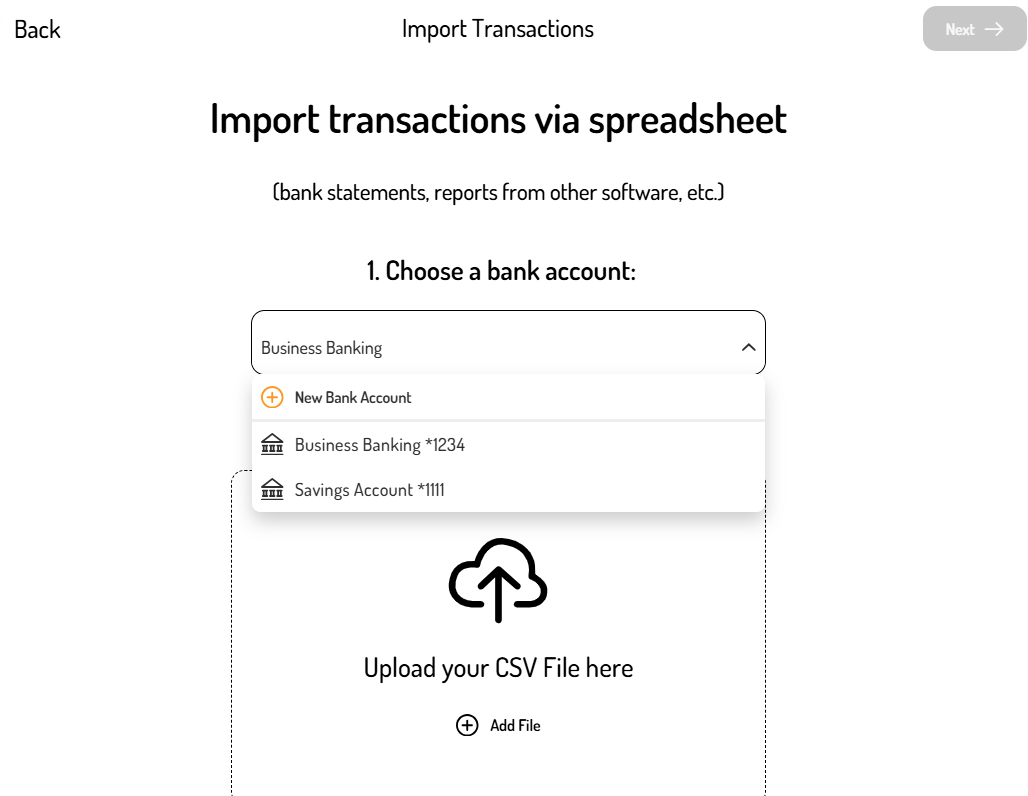
-
Upload the CSV file.
-
Click ‘Next’.
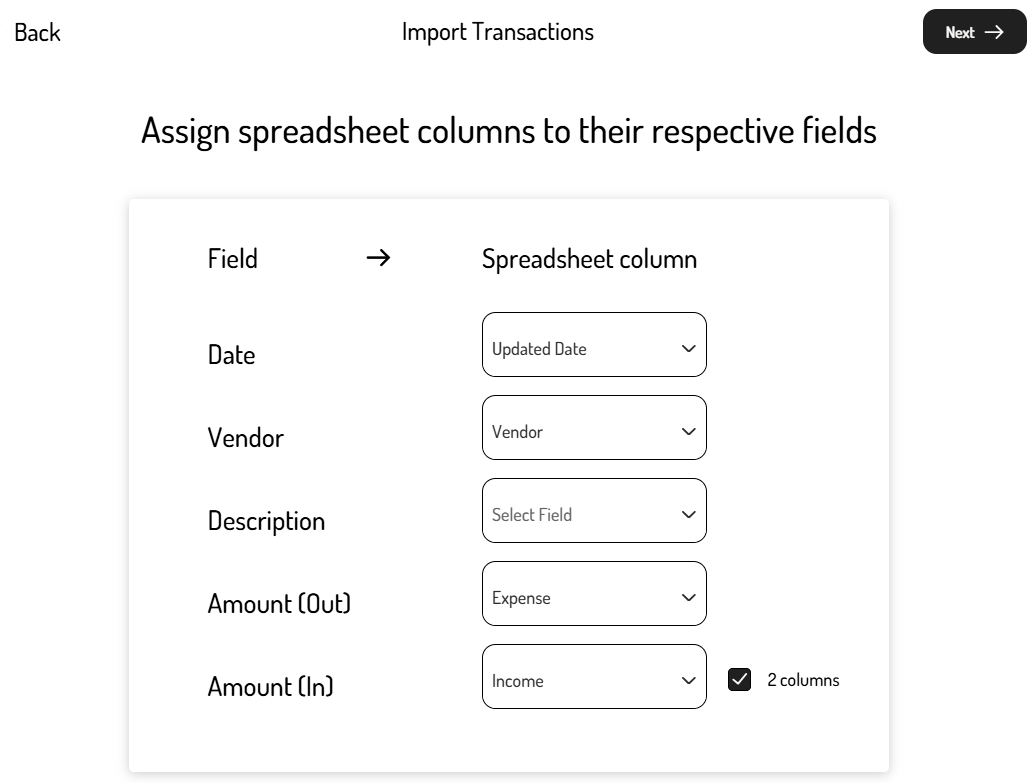
-
Assign the columns from the spreadsheet by using the drop-down menu to map the data fields to the corresponding column headers in the CSV.
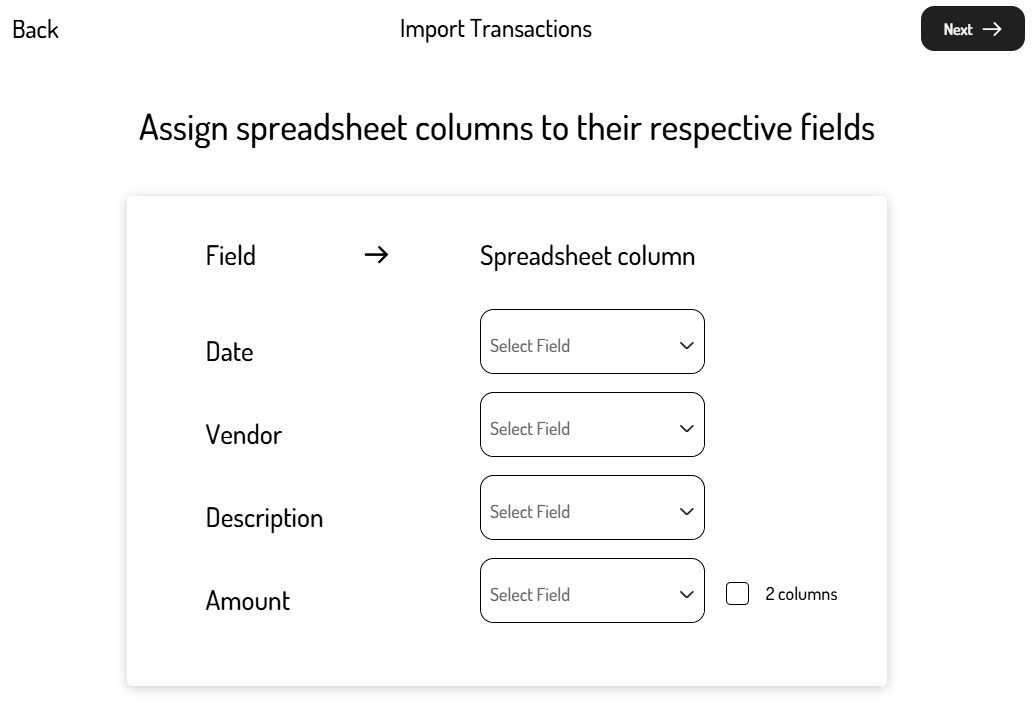
-
If the file lists deposits and withdrawals in separate columns, check the ‘2 columns’ checkbox next to amounts.
-
-
Click ‘Next’.
-
On the overview page, review the transactions and deselect the checkbox next to any transactions that should not be imported. If the amount columns were mapped incorrectly, the withdrawals/deposits can be reversed.
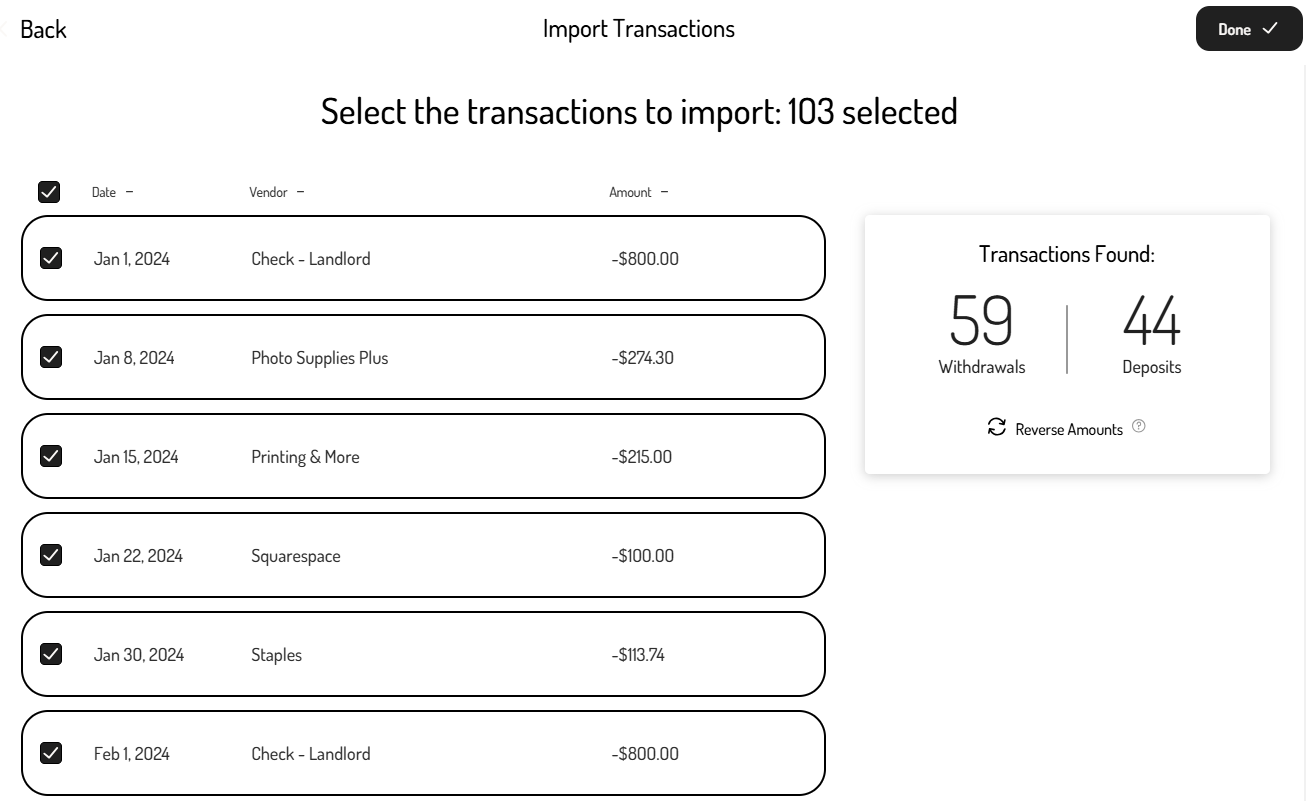
-
Once satisfied, click ‘Done’ to complete the import.
-
A pop-up will confirm when the import is complete.
After the CSV file has been imported, navigate to the Transaction Dashboard to view or edit the imported transactions.
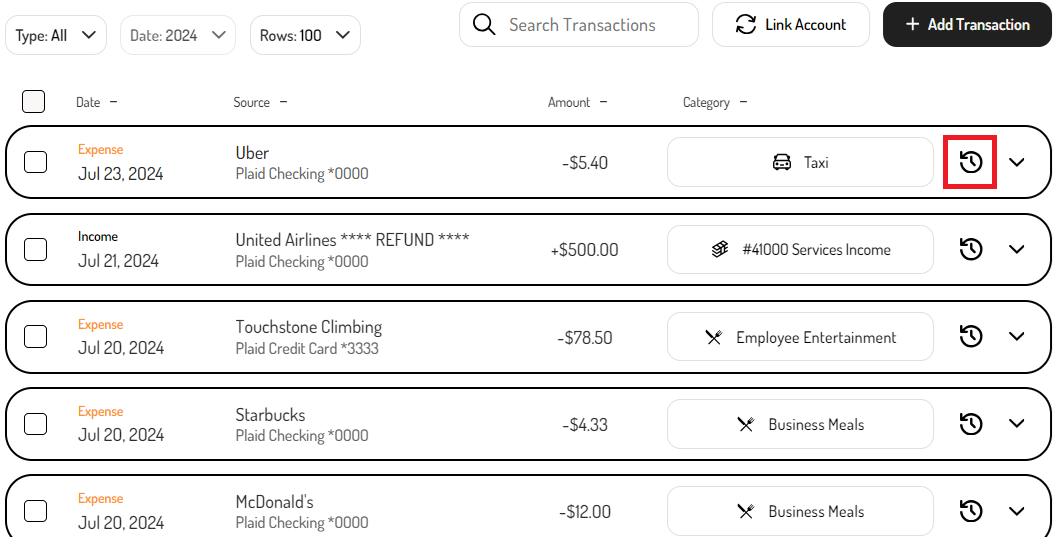
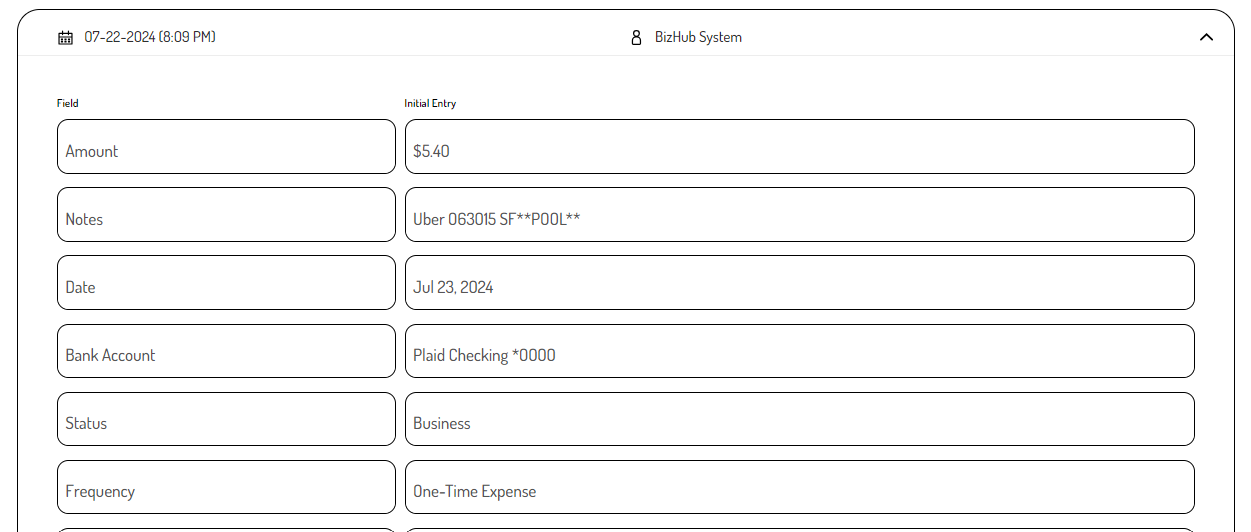
Audit Trail
The Audit Trail provides Partners with visibility into the revision history of any transaction, whether it’s an expense, income, tax payment, or bank transfer.
The Audit trail can be accessed via the Transaction Dashboard or as via the Audit Trail API.
To view the Audit Trail for a transaction in the Transaction Dashboard:
-
Click the Audit Trail Button on the transaction entry.
-
A list of changes will appear, showing the time, date, and the person who made each change.
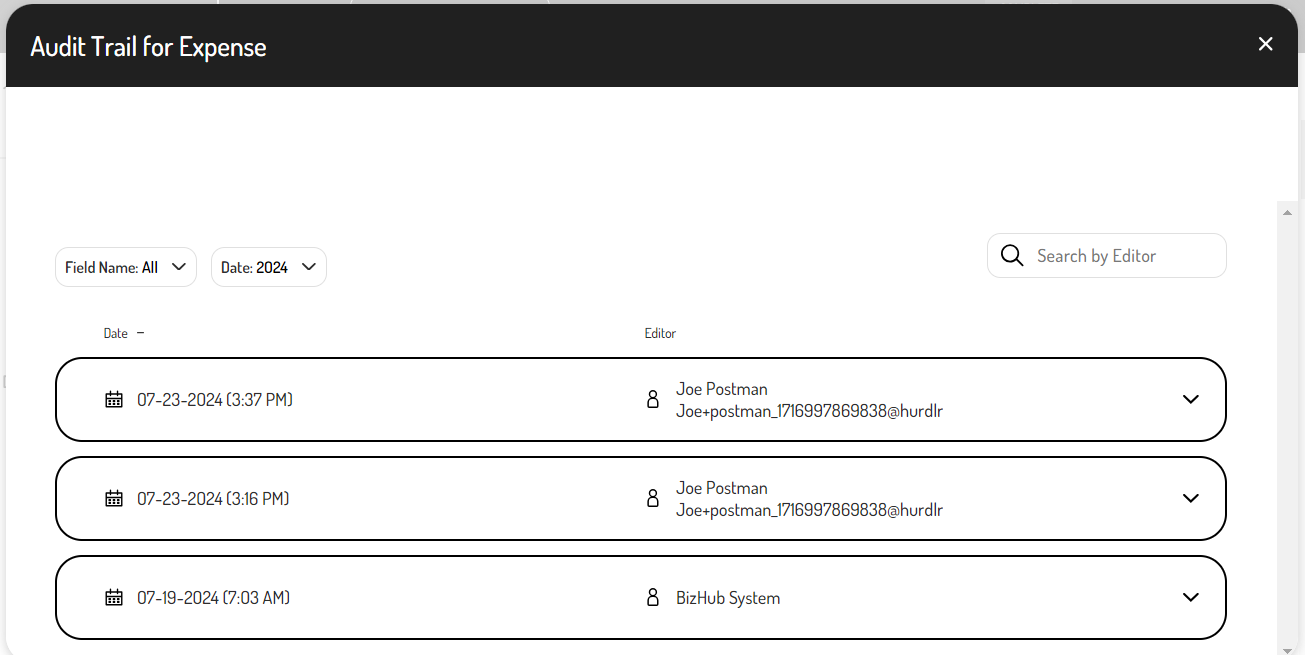
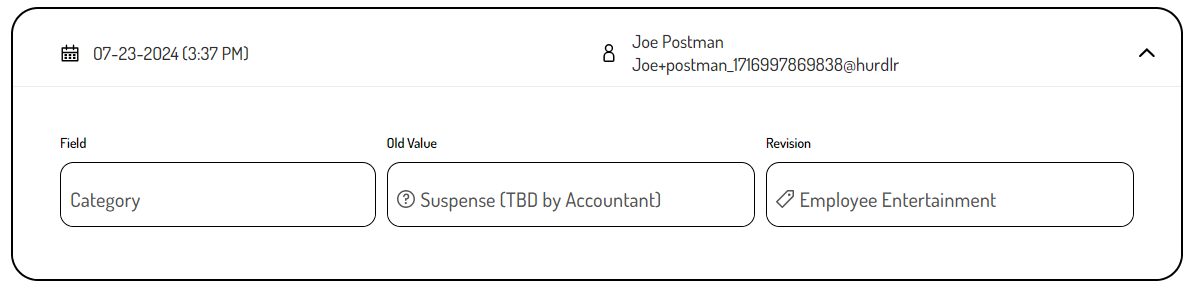
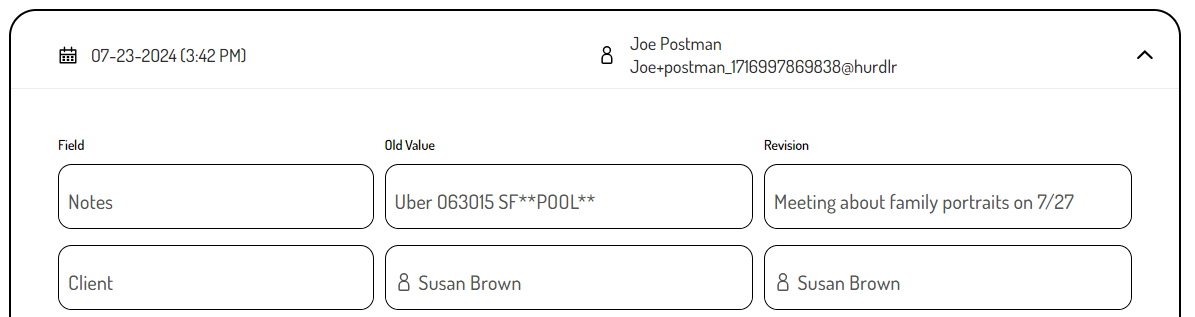
-
Click on any entry to view the details of the changes, including edits to the status, amount, vendor, bank account, conversion, and more.

A few things to keep in mind about the Audit Trail:
-
A new entry is created in the Audit Trail every time a transaction is edited and saved.
-
Each entry will indicate the specific field that was changed, the previous value, and the new revision.
-
If multiple fields are edited in a single update, they will be grouped into one Audit Trail entry.
-
The first Audit Trail entry is an automated system entry that records how the transaction was originated.
Updated 2 days ago